Azure Cloud Service Install Certificate Into Trusted Root Certificate Authorities Store with Azure Startup Task

Here’s a guide on how to install a certificate into Trusted Root Certificate Authorities store for Azure Cloud Services.

What we want to solve

In our case we had a web role (web app) that needed to communicate with a third party that we didn’t control, they were using a self signed certificate and required communication over HTTPS. For the TLS/SSL handshake to succeed we need to install the certificate into our trust store.

What others have done

There are solutions out there where people install the certificate using the portal into the personal store and then have a worker role move the certificate to the trusted CA store with administrative privileges at runtime. First of all, that’s a very cumbersome approach and second it uses resources that costs money, there is a much simpler way.

Solution

1. Include the certificate you want to install into your web app, optionally as a link.
azure-trusted-ca-1-add-certificate

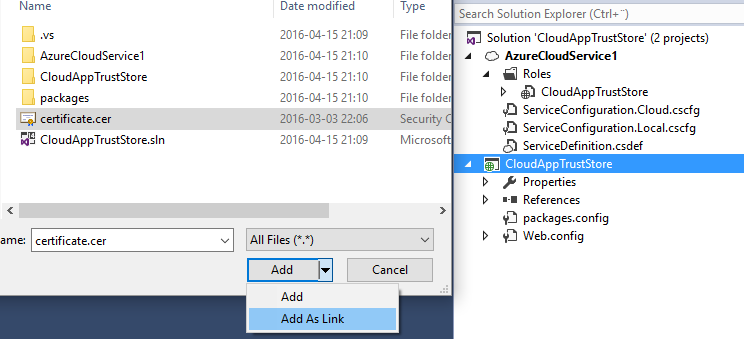
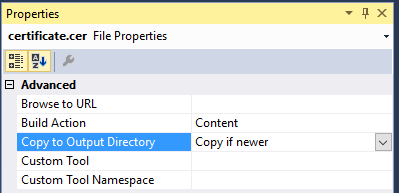
2. Make sure to set the Build Action to Content and Copy to Output Directory to Copy if newer.
azure-trusted-ca-2-content-copy

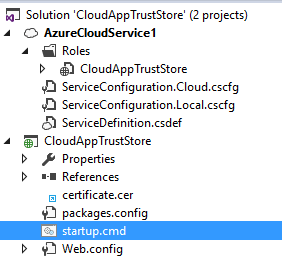
3. Add a startup.cmd also with Build Action set to Content and Copy to Output Directory set to Copy if newer.
azure-trusted-ca-3-startupcmd

4. Modify the contents of startup.cmd to the following:

certutil -addstore root certificate.cer

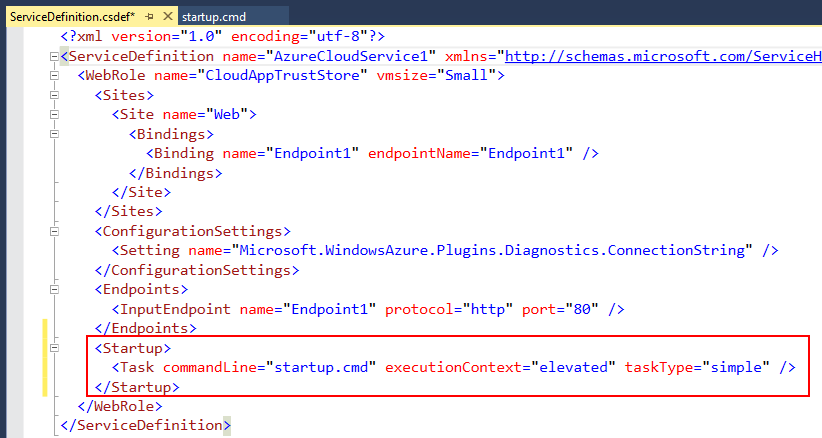
5. Open up ServiceDefinition.csdef and add the following lines to your web role configuration section.


Full context in our simple sample looks like this:
azure-trusted-ca-4-service-definition

6. You’re done! Next time you deploy the cloud service the certificate will be installed into the Trusted Root Certificate Authorities store for the VM.

What _not_ to do

You can find answers on stack overflow and blogs on how to install the certificate manually by remoting to the machine and using mmc locally. That is a bad idea since it will be gone next time the VM is teared down and re-created. And if you’re new to Azure Cloud Services, that’s not strange at all, it happens.

Final Words

These 5 steps are super easy compared to many other proposed solutions out there. We learned about it from security expert Dominick Baiers blog post from a while back, it’s a lot shorter but as he states — the title says it all!

Hope it helped!

Angular 2 Material Replacing Bootstrap

In this weeks screencast we fully replace bootstrap with material components for angular 2. Material2 just announced their alpha 2 release, adding a bunch of components, perfect timing for live coding screencast, code at https://github.com/ajtowf/ng2_play. The ng2play repo has also been updated to the latest angular2 version which at the time of writing is beta 15, see the changelog for details.

During the coding session we integrate the following components into our app:

Make sure to check out the screencast below, enjoy!

Screencast

Documentation / Demo App

There isn’t any official documentation for material2 yet, but there is a demo app in their github repo, here are the steps to get it up and running on your local dev machine:

  1. Make sure you have `node` installed with a version at _least_ 4.2.3.
  2. Run `npm install -g angular-cli` to install the Angular CLI.
  3. Clone the angular/material2 repo
  4. From the root of the project, run `npm install`, then run `npm run typings` to install typescript definitions.
  5. To build the project, run `ng build`.
  6. To bring up a local server, run `ng serve`. This will automatically watch for changes and rebuild.

After the changes rebuild, the browser currently needs to be manually refreshed. Now you can visit the prompted URL in your browser to explore the demo app.

Resouces on Angular Material

To learn more about material deisgn and components for angular, make sure to check out my pluralsight course Angular Material Fundamentals.

Until next time, have a nice day folks and keep on coding!

Programming Interview Questions: Recursion

In this screecast we solve two commonly asked interview questions; faculty and traversing binary trees.

Screencast

What’s recursion?

A recursive function is simply a function that repeatedly calls itself and the trick is to realize when to stop calling ourselves to avoid infinite loops that result in stack overflows.

If the interviewers ask you to write down an algoritm that gives you the n:th fibonacci number, calculate faculty or traverse a binary tree they probably want you to provide both an iterative and recursive solution. We don’t address fibonacci in the screencast, but the formula for the n:th number is simply the sum of the previous two, i.e.

f(n) = f(n-1) + f(n-2)

Is this a good interview question?

Here’s the recursive methods I developed during the screencast to calculate faculty and to sum the value of all the nodes in a binary tree:

    private static int sum(Node node) {
        if (node == null) return 0;
        return node.Value + sum(node.Left) + sum(node.Right);
    }
    
    private static long faculty(int n) {
        if (n == 1) return 1;
        return n * faculty(n - 1);
    }

As you can see the answers are usually very simple but it’s not unusual to see candidates try to make things more complicated than they need to be. Just keep it simple.

Interviewers tend to ask these kind of questions even if functional programming is a very small part of the day to day work. It’s always good to be prepared by training on some simple problems similar to the ones covered here. After one or two exercises you’ll get the hang of it and it won’t be a problem if they throw these kind of questions at you during the interview.

And as always, until next time, have a nice day!