
Consuming SignalR for AspNet Core from Angular
SignalR for AspNetCore is announced, read all about it here, in this screencast we take a first look at how to wire it up together with Angular.
Until next time, have an excellent day!
SignalR for AspNetCore is announced, read all about it here, in this screencast we take a first look at how to wire it up together with Angular.
Until next time, have an excellent day!

In this screencast we build an OData enabled backend using AspNet Core and connect it to Kendo UI for Angular 2‘s Grid Component in only 20 minutes. If you missed the first screencast in this two-part seriers, make sure to check it out here!
Until next time, have an excellent day and a super 2017!
In this screencast we evaluate if Kendo UI for Angular 2, more specifically if the Grid Component, fulfills the requirements to deliver a solution for a client.
Happy holidays and until next time, have an excellent day!

Angular 2 is finally released and the tooling around it is maturing as well. In this screencast we use Angular CLI to scaffold an application from scratch, add routing to it and bootstrap material2 and finally steal the design from Jeremys sample app repo who’s on the material2 team. After recording this screencast I went ahead and upgraded the ng2play repo to the fully released version av angular2 (changelog 2.0.2).
As mentioned I decided to migrate the repo off screen since it would just be too messy and hard to follow along otherwise. For me it was actually easier to throw in my “old” components and services in a newly created application since a lot had changed, especially when moving to webpack.
Since we got inspired by Jeremys sample app we got two new themes in this screencast.

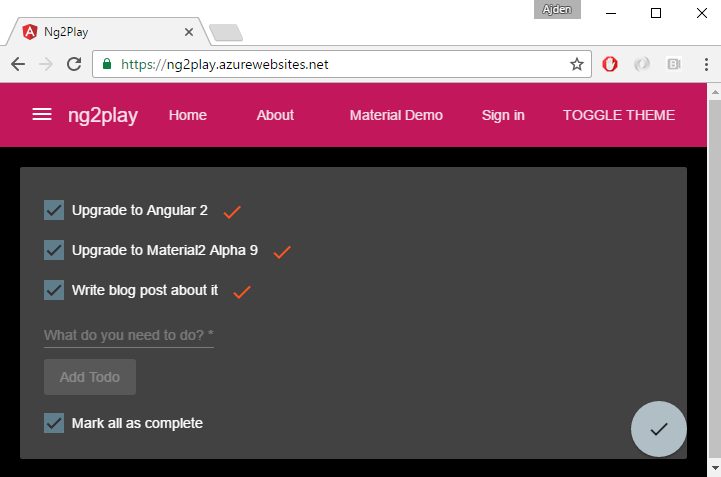
I also decided to keep the material 2 components demo as a separate component in the app.
Since we’re using webpack now it’s super easy to compile sass files, all we needed to do was to add a line to angular-cli.json and restart the watch:
{
  "project": { ... },
  "apps": [
    {
      ...
      "styles": [
        "styles.css",
        "app-theme.scss"
      ],
      ...
    }
  ],
  "addons": [],
  "packages": [],
  "e2e": { ... },
  "test": { ... },
  "defaults": { ...}
}
Tooling is coming along really great with angular2 and in the screencast I scaffold an app according to best practices literally in matter of minutes, and the material2 team is producing some beautiful and well made components. Even though it’s nice to say that angular 2 is finally here it will be exciting to see what future versions of angular will bring us. They’ve just recently announced the versioning and releasing strategy for angular and may I say it’s pretty interesting.
Hope you’ve enjoyed the screencast, and as always have an excellent day!

Screencast on how to execute javascript from AspNet Core on the backend, inspired by Steve Sanderson NDC Sydney talk. Thumbnail trying to illustrate how my mind gets blown by the possibilities! ;-)
Awesome work by the AspNet team, until next time, have an excellent day!
Angular Modules, also known as NgModules, are the powerful new way to organize and bootstrap your Angular application. In this screencast we upgrade the ng2play repo to the latest release candidate (RC5).
Here are the links related to the screencast.
We basically follow the migration steps in the guide, which are:
A couple of months ago I did a rant on forms in angular, and finally they are starting to adress some of the issues. For instance it wasn’t possible to reset a form and its validation in earlier versions, which now is possible. We can simply call a reset method on either a form group or a single control.
Modules is definitely something that we needed to be able to get rid of a lot of boiler plate code in our components. Even if my opinion is that it’s a bit late to introduce this in between two release candidates the end result weighs up for it. I’ll try to do a separate screen on lazy loading modules, which is really easy now.
Hope this screencast helped you migrate to RC5 and learn more about modules in Angular.
Until next time, have an excellent day!
Discussion on do’s and don’ts when combining AspNet with Single Page Applications such as Angular, Aurelia or React. Main question: Should we separate frontend and backend into separate solutions or keep them together as the new AspNet template in VS2015 suggests?
What’s your take on it? Agree or disagree? Let me know!
Until next time, have an excellent day!
In this screencast I use the angular-cli tool for the first time to package an angular2 app for production before git deploying it to Microsoft Azure.
The CLI is at the moment of writing in beta and very much still a work in progress. It’s an excellent tool imho for scaffolding a new project, components and services. In this screencast we ran the following commands:
  ng new PROJECT_NAME // creates a new project
  ng g component COMPONENT_NAME // creates a new component
  ng g service SERVICE_NAME // creates a new service
  ng build -prod // builds a production ready version
  ng serve -prod // serves a production ready version
The CLI allows you to do a lot more, I really recommend you to install it and play with it for yourselves.
npm install -g angular-cli
Also make sure to check out their official github repo which serves as great documentation.
In this screencast we took a couple of short cuts, we didn’t setup a full CI environment. We initialized a new git repository in the dist folder and pushed only that folder to azure, meaning we built it on our dev machine, big NO NO. The workflow we want would look something like this instead.
Nevertheless we still need to enable a git repository for our web app, here’s an excellent guide on how to do that, it basically takes you through the steps I did in the screencast. Basically from the dist folder:
These commands should fire up an authentication dialog and once you’ve provided the credentials the files should be pushed to the site.
With these steps we’ve managed to create a production build of an angular 2 app and deployed it to Azure. We did it all with just a few command lines using the angular CLI which was pretty awesome. The CLI does lagg behind the release candidates and is a work in progress so please use with caution.
Until next time, have an excellent day!
In this episode we upgrade the ng2play repo to leverage the new 3.0 router and implement a route guard to protect components that require authentication. Here’s the entire changeset, not that bloody considering the changes but this is also a very small application.
With the old router we decorated our app component with the RouteConfig annotation to configure the routs.
  @Routes([
    { path: '/', component: Todo },
    { path: '/about/:id', component: About },
    { path: '/profile', component: Profile}
  ])
  export class AppComponent { ... }
With the new router the routing configuration is no longer bound to a specific component, instead we make it accessible as a provider by exporting it as a const from a separate routes.ts file. Another essential change is that we need to remove the forward slash in the beginning when defining the path.
  import { provideRouter, RouterConfig } from '@angular/router';

  export const appRoutes: RouterConfig = [
    { path: '', component: Todo },
    { path: 'about/:id', component: About },
    { path: 'profile', component: Profile }
  ];

  export const APP_ROUTER_PROVIDER = provideRouter(appRoutes);
Wich we can pass in to the bootstrap function in boot.ts instead of passing ROUTER_PROVIDERS as we did earlier.
import {APP_ROUTER_PROVIDER} from './routes';

bootstrap(AppComponent, [
  ...
  APP_ROUTER_PROVIDER,
  ...
]);
A component that we route to can access information about route parameters, query parameters and URL fragments by something called, ActivatedRoute, which we can inject into the constructor. The key difference is that route parameters can be accessed through the params property as an Observable or by the snapshot property if subscribing for future changes is overkill. Here’s both ways in our about.ts component:
  import {Component, OnInit} from '@angular/core';
  import { ActivatedRoute } from '@angular/router';

  @Component({
    selector: 'about',
    template: `Welcome to the about page! This is the ID: {{id}}`
  })
  export class About implements OnInit {
    id: string;

    constructor(private route: ActivatedRoute) {}

    ngOnInit() {
      this.id = this.route.snapshot.params['id'];
      this.route.params
        .map(params => params['id'])
          .subscribe(id => {
            this.id = id;
        });
    }
  }
Previously we could prevent our components from activating for unauthenticated users by using the @CanActivate and @CanDeactivate annotations. The guarding logic could be put inside a callback function:
import {CanActivate} from '@angular/router';
@Component({ ... })
@CanActivate(() => tokenNotExpired())
export class Profile { ... }
This approach suffered from that we don’t have access to the applications dependency injection and that we need to decorate each component class with it. The new router solves these problems, we can easily create an auth-guard injectable service that we can pass in to the route configuration accordingly:
  import { provideRouter, RouterConfig } from '@angular/router';
  import { AuthGuard} from './auth-guard';

  export const appRoutes: RouterConfig = [
    { path: '', component: Todo },
    { path: 'about/:id', component: About },
    { path: 'profile', component: Profile, canActivate: [AuthGuard] }
  ];

  export const APP_ROUTER_PROVIDER = provideRouter(appRoutes);
The auth guard has access to the applications dependency injection and we can redirect the user to the root component if they are not allowed to navigate to the component.
import {tokenNotExpired} from 'angular2-jwt';
import { Injectable } from '@angular/core';
import {
  CanActivate,
  ActivatedRouteSnapshot,
  RouterStateSnapshot,
  Router
} from '@angular/router';

@Injectable()
export class AuthGuard implements CanActivate {
  constructor(private router: Router) {}

  canActivate(next: ActivatedRouteSnapshot, state: RouterStateSnapshot) {
    if (tokenNotExpired()) {
      return true;
    }

    this.router.navigate(['']);
    return false;
  }
}
Let’s also not forget that we’ll need to pass the auth-guard to our bootstrap method to be able to resolve the dependency:
import {APP_ROUTER_PROVIDER} from './routes';
import {AuthGuard} from './auth-guard';

bootstrap(AppComponent, [
  ...
  APP_ROUTER_PROVIDER,
  AuthGuard
  ...
]);
With these steps we’ve managed to migrate our application to the new 3.0 router, quite frictionless seemingly, but imho they started calling angular2 for RC way too early. It’s still moving too much to even consider using this for production anytime soon.
Until next time, have an excellent day!

In this episode we take a first look at structured logging from an AspNet Core application using Serilog and Seq.
Configuring the web app to leverage serilog only requires 3 simple steps. First make sure to get the nuget packages by adding these lines to your packages.json.
    "Serilog.Extensions.Logging": "1.0.0-rc2-*",
    "Serilog.Sinks.RollingFile": "2.0.0-rc-*",
    "Serilog.Sinks.Seq": "2.0.0-rc-*"
In the constructor of your Startup.cs file, configure the logger to log to both the Seq endpoint and to a rolling file, or that’s at least what I did.
    Log.Logger = new LoggerConfiguration()
        .MinimumLevel
        .Information()
        .WriteTo.RollingFile("log-{Date}.txt", LogEventLevel.Information)
        .WriteTo.Seq("http://localhost:5341/")
        .CreateLogger();
This assumes that you’ve installed the Seq MSI on your local machine, you can grab it from here. Finally, add serilog to the logger factory in the configure method.
public void Configure(IApplicationBuilder app, IHostingEnvironment env, ILoggerFactory loggerFactory)
{
    loggerFactory.AddConsole(Configuration.GetSection("Logging"));
    loggerFactory.AddDebug();
    loggerFactory.AddSerilog();
}
That’s it, browse http://localhost:5341 and you should see the following:

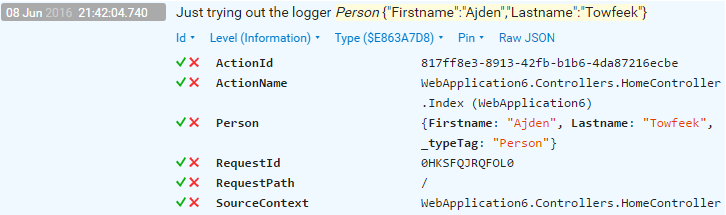
To log entire objects that will be queryable, simple pass an @-sign in front of the tag name that you want to create. For instance, to log a person object and create a tag accordingly from the HomeController we do the following.
public class Person
{
    public string Firstname { get; set; }
    public string Lastname { get; set; }
}

public class HomeController : Controller
{
    private readonly ILogger _logger;

    public HomeController(ILogger logger)
    {
        _logger = logger;
    }

    public IActionResult Index()
    {
        var p = new Person { Firstname = "Ajden", Lastname = "Towfeek" };
        _logger.LogInformation("Just trying out the logger {@Person}", p);
        return View();
    }
}
Which will result in the following queryable log post in Seq:
It’s really powerful to log information with rich, structured and queryable log data but there are also some downsides for the moment with using Seq that I’d like to point out.
Having that said, I still think the idea of structured logging is very interesting and it provides an extra dimension of information when fixing/reproducing bugs. I just won’t be using Seq in production just yet.
Until next time, have an excellent day!