
Enabling C# and .NET Core Debugging in VS Code from an Offline Environment
VS Code has quickly become a fairly popular IDE/editor and a free light weight alternative to Visual Studio. Getting up and running with editing and debugging C# code is usually as simply as installing the csharp extension from within VS Code. Great instructions can be found here.
But what if your computer isn’t hooked up to the internet? Here’s a great question on stackoverflow where the correct answer allows you to at least install the csharp extension, but once the extension is loaded some errors will be logged that the tools to enable .NET Core debugging failed to install due to no internet connection. And there is no bundle out there containing it all today.
So, how do we solve this? We’ll build the extension ourselves from the source, isn’t open source great?
Solution
The omnisharp github page has a reported issued on the matter but it’s closed without really providing the full and complete answer. Modifications to the gulp file needs to be made to be able to build the vsix file on a windows machine.
Cloning the repo
Start by simply cloning the repo, installing the npm dependencies and compiling the code:
    git clone https://github.com/OmniSharp/omnisharp-vscode.git
    cd omnisharp-vscode
    npm i
    npm run compile
Manipulating the gulp file
Before building the vsix file as the github issue suggests we’ll need to do a couple of changes, at least on a windows machine. Open up gulpfile.js wich is located at the root level of the repo and on line 95 change:
throw new Error('Do not build offline packages on windows. Runtime executables will not be marked executable in *nix packages.');
to
console.log('Do not build offline packages on windows. Runtime executables will not be marked executable in *nix packages.');
also it’s a bit overkill to build the extension for all platforms, let’s just build it for our intendent platform, on line 125 you should find the following:
    var packages = [];
    packages.push(new PlatformInformation('win32', 'x86_64'));
    packages.push(new PlatformInformation('darwin', 'x86_64'));
    packages.push(new PlatformInformation('linux', 'x86_64', new LinuxDistribution('centos', '7')));
    packages.push(new PlatformInformation('linux', 'x86_64', new LinuxDistribution('debian', '8')));
    packages.push(new PlatformInformation('linux', 'x86_64', new LinuxDistribution('fedora', '23')));
    packages.push(new PlatformInformation('linux', 'x86_64', new LinuxDistribution('opensuse', '13.2')));
    packages.push(new PlatformInformation('linux', 'x86_64', new LinuxDistribution('rhel', '7.2')));
    packages.push(new PlatformInformation('linux', 'x86_64', new LinuxDistribution('ubuntu', '14.04')));
    packages.push(new PlatformInformation('linux', 'x86_64', new LinuxDistribution('ubuntu', '16.04')));
you can change this to win32 only by simply removing the other lines:
    var packages = [];
    packages.push(new PlatformInformation('win32', 'x86_64'));
Now we’re ready to build!
Build the VSIX-file
Now let’s build our vsix-package by running:
node node_modules/gulp/bin/gulp.js package:offline
which should provide the following output:
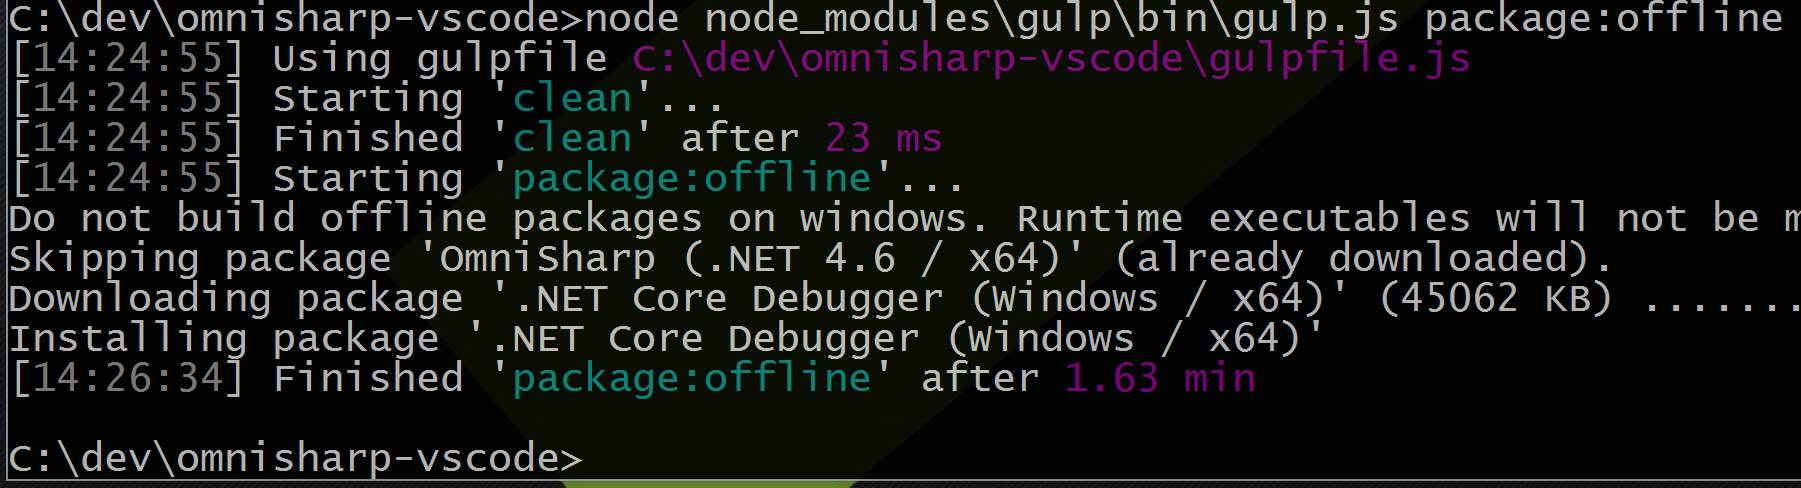
and a csharp.1.12.0-beta1-undefined.vsix file, mine’s around 200MB.
Installing the VSIX-file
Just copy the VSIX to the offline computer and in VS Code press F1, start typing “Install from VSIX” and browse the file and restart VS Code once it’s installed.
That’s it, you’re now ready to debug .NET Core applications by simply pressing F5. VS Code will help you to add the necessary json configuration files to the .vscode folder.